Categories
code graphics opencv python vision work

Revisiting graph-cut segmentation with SLIC and color histograms [w/Python]

As part of the computer vision class I’m teaching at SBU I asked students to implement a segmentation method based on SLIC superpixels. Here is my boilerplate implementation.
This follows the work I’ve done a very long time ago (2010) on the same subject.
For graph-cut I’ve used PyMaxflow: https://github.com/pmneila/PyMaxflow, which is very easily installed by just pip install PyMaxflow
The method is simple:

  • Calculate SLIC superpixels (the SKImage implementation)
  • Use markings to determine the foreground and background color histograms (from the superpixels under the markings)
  • Setup a graph with a straightforward energy model: Smoothness term = K-L-Div between superpix histogram and neighbor superpix histogram, and Match term = inf if marked as BG or FG, or K-L-Div between SuperPix histogram and FG and BG.
  • To find neighbors I’ve used Delaunay tessellation (from scipy.spatial), for simplicity. But a full neighbor finding could be implemented by looking at all the neighbors on the superpix’s boundary.
  • Color histograms are 2D over H-S (from the HSV)

Result

Categories
cmake code opencv vision work

OMG CMake/OpenCV3 can you be more difficult? Linking order problems with OpenNI2…

So I just spent 1.5 hours figuring this out.
Compiling an example on Ubuntu 16.04 with OpenCV built from scratch with OpenNI2 support.
(OpenNI2 is from Orbbec, but that doesn’t make any difference: https://orbbec3d.com/develop/)
When using this straightforward CMake script for compilation – it doesn’t work:

cmake_minimum_required(VERSION 3.2)
project(MyApp)
find_package(OpenCV 3 REQUIRED)
set(OPENNI2_LIBS "OpenNI2")
link_directories("/home/user/Downloads/2-Linux/OpenNI-Linux-x64-2.3/Redist")
add_executable(myapp main.cpp)
target_link_libraries(myapp ${OpenCV_LIBS} ${OPENNI2_LIBS})

Complains of undefined references:

/usr/bin/c++   -g   CMakeFiles/myapp.dir/main.cpp.o  -o myapp  -L/home/user/Downloads/2-Linux/OpenNI-Linux-x64-2.3/Redist -rdynamic -lOpenNI2 /usr/local/lib/libopencv_shape.so.3.2.0 /usr/local/lib/libopencv_stitching.so.3.2.0 /usr/local/lib/libopencv_superres.so.3.2.0 /usr/local/lib/libopencv_videostab.so.3.2.0 /usr/local/lib/libopencv_objdetect.so.3.2.0 /usr/local/lib/libopencv_calib3d.so.3.2.0 /usr/local/lib/libopencv_features2d.so.3.2.0 /usr/local/lib/libopencv_flann.so.3.2.0 /usr/local/lib/libopencv_highgui.so.3.2.0 /usr/local/lib/libopencv_ml.so.3.2.0 /usr/local/lib/libopencv_photo.so.3.2.0 /usr/local/lib/libopencv_video.so.3.2.0 /usr/local/lib/libopencv_videoio.so.3.2.0 /usr/local/lib/libopencv_imgcodecs.so.3.2.0 /usr/local/lib/libopencv_imgproc.so.3.2.0 /usr/local/lib/libopencv_core.so.3.2.0 -Wl,-rpath,/home/user/Downloads/2-Linux/OpenNI-Linux-x64-2.3/Redist:/usr/local/lib
/usr/local/lib/libopencv_videoio.so.3.2.0: undefined reference to `oniStreamGetProperty'
/usr/local/lib/libopencv_videoio.so.3.2.0: undefined reference to `oniRecorderDestroy'
/usr/local/lib/libopencv_videoio.so.3.2.0: undefined reference to `oniDeviceIsCommandSupported'
/usr/local/lib/libopencv_videoio.so.3.2.0: undefined reference to `oniDeviceSetProperty'

You’ll notice that -lOpenNI2 does indeed appear for correct linking.
The linker doesn’t complain that lib was not found – it just misses the references.
This lead me to understand it’s a linking order problem (after ~45 minutes of banging my head vs. the keyboard and swearing profusely).
Some more swearing and head banging got me to understand that CMake is messing around with the link order.
So even if try:

target_link_libraries(myapp ${OpenCV_LIBS} ${OPENNI2_LIBS} ${OpenCV_LIBS} ${OPENNI2_LIBS})

i.e. making the order effectively meaningless — it still doesn’t work!
More swearing and head banging, another ~40 minutes passed, and I figured out a solution.
The real solution is to slap someone in CMake in the face with a trout, but here’s a solution to my problem:

find_package(OpenCV 3 REQUIRED core highgui videoio) # ORDER MATTERS!!! videoio must be last!
set(OpenCV_LIBS "${OpenCV_LIBS};OpenNI2") #add openni2 at the end (although cmake doesn't keep order anyway)
target_link_libraries(myapp ${OpenCV_LIBS})

Now it compiles.
And look at the make VERBOSE=1:

/usr/bin/c++   -g   CMakeFiles/myapp.dir/main.cpp.o  -o myapp  -L/home/user/Downloads/2-Linux/OpenNI-Linux-x64-2.3/Redist -rdynamic /usr/local/lib/libopencv_highgui.so.3.2.0 /usr/local/lib/libopencv_videoio.so.3.2.0 -lOpenNI2 /usr/local/lib/libopencv_core.so.3.2.0 -Wl,-rpath,/home/user/Downloads/2-Linux/OpenNI-Linux-x64-2.3/Redist:/usr/local/lib -Wl,-rpath-link,/usr/local/lib

Can you see how highgui and videoio are before OpenNI2, and core is after?
Why? Whhhhhhy?
The key is to get OpenNI to be linked in order after videoio.
OMG CMake, OMG OpenCV, OMG you gaiz, W-T-F?
Update:
This method breaks down as soon as more OpenCV components are added. The order goes haywire again, and OpenNI2 comes before videoio, which breaks the link.
As of now the way I can compile it is like so:

set(LINK_LIBS /usr/local/lib/libopencv_core.so.3.2
              /usr/local/lib/libopencv_highgui.so.3.2
              /usr/local/lib/libopencv_videoio.so.3.2
              /usr/local/lib/libopencv_imgproc.so.3.2
              /usr/local/lib/libopencv_calib3d.so.3.2
              OpenNI2)
Categories
code electronics work

Simple ATTiny85 USB board

IMG_20140623_121908_fixI needed to create a small, cheap USB-enabled circuit to serve as a key logger, and I’ve found some nice projects online that explain how to do this.
I found out you could use an ATTiny85 to run the V-USB software USB stack, and I only needed the one input pin to gather data (it’s going to be a USB “That was easy” button).
Since this was done so many times before, I will be brief, and try to point out problems I had instead of a regular tutorial.

Categories
code graphics opencv programming school vision work

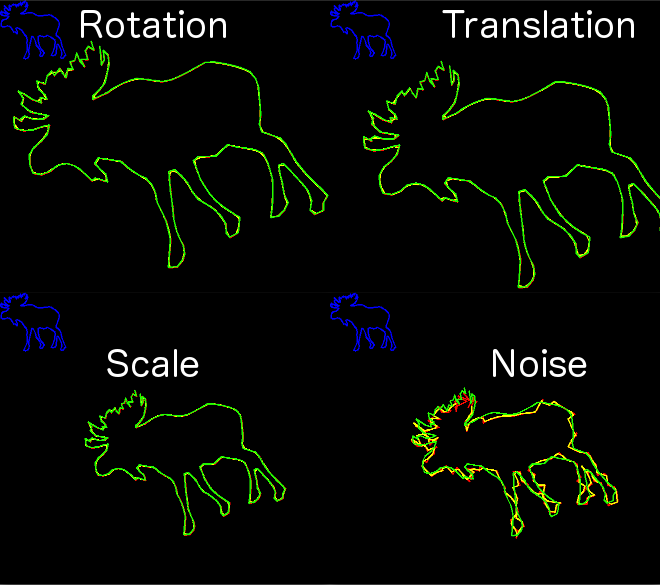
2D curve matching in OpenCV [w/ code]


Just sharing some code and ideas for matching 2D curves. I was working for a while on matching 2D curves to discover shapes in images, but it didn’t work out, what did succeed is this 2D curve matcher that seems to be very robust for certain applications. It’s based on ideas from the Heat Kernel Signature and the CSS Image (that I introduced in my latest post), all around inspecting curves under different level of smoothing.

Categories
code programming python work

Getting all the links from a MediaWiki format using PyParsing

Hi,
Just sharing a snippet of code. Part of a project I’m doing, I need to analyse the links in the Wikipedia corpus. While using the API is one solution, it doesn’t retain the order of where links appear in the page. It also returns links that are not part of the main text, which makes the linkage DB very cluttered.
So, I set out to parse the raw MediaWiki format all Wikipedia articles are written in, to get only the relevant links and in order. I call them contextual because they live inside the text and have context.
Initially I used string matching, and other complex string scraping parsing methods. It was a bust. There are too many end-cases to deal with. That is when I discovered PyParsing, the excellent parsing library. It did the job, and here are the results.

Categories
Recommended Solutions tips Website work

UnderGet – Download blocked content

Ever wanted to try and download an mp3 file at your workplace, but couldn’t because corporate firewall policy was to block every url ending with the .mp3 prefix?

Categories
code graphics opencv programming Recommended video vision Website work

Hand gesture recognition via model fitting in energy minimization w/OpenCV

hands with model fittedHi
Just wanted to share a thing I made – a simple 2D hand pose estimator, using a skeleton model fitting. Basically there has been a crap load of work on hand pose estimation, but I was inspired by this ancient work. The problem is setting out to find a good solution, and everything is very hard to understand and implement. In such cases I like to be inspired by a method, and just set out with my own implementation. This way, I understand whats going on, simplify it, and share it with you!
Anyway, let’s get down to business.
Edit (6/5/2014): Also see some of my other work on hand gesture recognition using smart contours and particle filters

Categories
Solutions Stream work

Stream your favorite radio station to your workplace

I want to suggest a trick that worked for me. My work place blocks most of the popular radio stations stream sites in my country.
I can understand why they’re doing that, but hey – if you want to save bandwidth I suggest you block YouTube (not that I complain…)
Well, I thought of a way to listen to my favorite radio station from work, by re-streaming it from my home. And it worked!

It can also work for you, in case your IT does not block by protocol, only by address.

So here’s how to do it:

Categories
graphics programming Website work

Extending Justin Talbot's GrabCut Impl [w/ code]

Justin Talbot has done a tremendous job implementing the GrabCut algorithm in C [link to paper, link to code]. I was missing though, the option to load ANY kind of file, not just PPMs and PGMs.
So I tweaked the code a bit to receive a filename and determine how to load it: use the internal P[P|G]M loaders, or offload the work to the OpenCV image loaders that take in many more type. If the OpenCV method is used, the IplImage is converted to the internal GrabCut code representation.

Image<Color>* load( std::string file_name )
{
 if( file_name.find( ".pgm" ) != std::string::npos )
 {
 return loadFromPGM( file_name );
 }
 else if( file_name.find( ".ppm" ) != std::string::npos )
 {
 return loadFromPPM( file_name );
 }
 else
 {
 return loadOpenCV(file_name);
 }
}
void fromImageMaskToIplImage(const Image<Real>* image, IplImage* ipli) {
 for(int x=0;x<image->width();x++) {
 for(int y=0;y<image->height();y++) {
 //Color c = (*image)(x,y);
 Real r = (*image)(x,y);
 CvScalar s = cvScalarAll(0);
 if(r == 0.0) {
 s.val[0] = 255.0;
 }
 cvSet2D(ipli,ipli->height - y - 1,x,s);
 }
 }
}
Image<Color>* loadIplImage(IplImage* im) {
 Image<Color>* image = new Image<Color>(im->width, im->height);
 for(int x=0;x<im->width;x++) {
 for(int y=0;y<im->height;y++) {
 CvScalar v = cvGet2D(im,im->height-y-1,x);
 Real R, G, B;
 R = (Real)((unsigned char)v.val[2])/255.0f;
 G = (Real)((unsigned char)v.val[1])/255.0f;
 B = (Real)((unsigned char)v.val[0])/255.0f;
 (*image)(x,y) = Color(R,G,B);
 }
 }
 return image;
}
Image<Color>* loadOpenCV(std::string file_name) {
 IplImage* im = cvLoadImage(file_name.c_str(),1);
 Image<Color>* i = loadIplImage(im);
 cvReleaseImage(&im);
 return i;
}

Well, there’s nothing fancy here, but it does give you a fully working GrabCut implementation on top of OpenCV… so there’s the contribution.

GrabCutNS::Image<GrabCutNS::Color>* imageGC = GrabCutNS::loadIplImage(orig);
 GrabCutNS::Image<GrabCutNS::Color>* maskGC = GrabCutNS::loadIplImage(mask);
 GrabCutNS::GrabCut *grabCut = new GrabCutNS::GrabCut( imageGC );
 grabCut->initializeWithMask(maskGC);
 grabCut->fitGMMs();
 //grabCut->refineOnce();
 grabCut->refine();
 IplImage* __GCtmp = cvCreateImage(cvSize(orig->width,orig->height),8,1);
 GrabCutNS::fromImageMaskToIplImage(grabCut->getAlphaImage(),__GCtmp);
 //cvShowImage("result",image);
 cvShowImage("tmp",__GCtmp);
 cvWaitKey(30);

I also added the GrabCutNS namespace, to differentiate the Image class from the rest of the code (that probably has an Image already).
Code is as usual available online in the SVN repo.
Enjoy!
Roy.

Categories
Android Java Mobile phones programming Solutions work

First steps in Android programming

Last week I finished my first Android application. All through the development stage I had to Google a lot for examples which some were really hard to find (even though you can find reference for everything in the SDK, for me, it’s easier to understand from a code sample).
My mobile company allows you to send 10 free daily SMS through their website, and after that each text message is still half priced, so I decided to take a challenge and create a UI that allows me to send my messages from the phone through the website automatically.
The core of my software was pure java, so even though it wasn’t straight forward to accomplish, I kinda know the material.
The main issues were after – when I got to the android implementation and UI
Here are the issues I needed, and will supply examples for in this post:
(Of course – for you that are more experienced than me with Android development, please forgive if I’m not doing everything ‘by the book’, it’s simply what I could find. So if you have any suggestions or improvement please send them to me or post a comment J )

  • How to find out if there is an active network on the device
  • How to create options menu
  • How to create and clear notification in the notification area
  • How to declare your program as “SMS Sender” (‘Complete action using…’)
  • Taking care of orientation (Landscape and Portrait mode for UI)

Here is the code I ended up using. Hope you find it helpful